
3D Prints, Modular Fiddle
Print Settings for the Modular Fiddle
Jan
Musical instruments are extremely sensitive to very small changes. Naturally then, your materials and print settings are super important for making a great Modular Fiddle! In this post, I’ll go over the materials and print settings that I use, having printed, built, and played dozens of Modular Fiddles.
Note: links I provide to Proto-Pasta materials are affiliate links. Click them to purchase great material and support my work! Here’s my affiliate link if you’d like it now.
Versions and Revisions
Currently there are three major versions of the Modular Fiddle: V1, V2, and V3. V1 is fallow and I do not recommend making V1 fiddles. V2 is a good option for many builds! If you’re building a 4-string or a Hardanger Fiddle, V2 is a good choice. V3 uses bolts and threaded inserts to attach the neck and body. This is a more robust connection and is best for instruments with higher tension (5-string). Also for V3 you have the option to use a redesigned saddle and endpin for better strength (but more difficult assembly). I will focus future development on the V3 platform, but I would not say that V2 is fallow, exactly.
V3 is available for all 4-string and 5-string builds. V3 is not yet available for Hardanger or Gamba builds.
Within each version there are a number of revisions. Generally speaking, you should select the latest revision (highest number). Some files have other descriptions in the title, like Neck-V2-R3-noBout, which is a neck with no false bout, whereas Neck-V2-R3-bout has a false bout. For the body, there are now CFPLA and PLA specific models, so look for those descriptors for V2-R12 and V3 bodies.
Materials
Let’s talk materials first. For the body, I have had the best results using standard CFPLA from Proto Pasta. The HTPLA-CF is good, too, but is a bit more difficult to print and also a bit less stiff than the CFPLA. That said, there are now two body designs, one for CFPLA and one for PLA. The PLA body printed with standard PLA makes a pretty darn good fiddle! So there is less of a difference now. In the end, make both!
Other makers have used PETG, carbon fiber filled PETG, and carbon fiber filled nylons. They report good results. I have tried these materials as well, but I have found CFPLA to make the best body for the Modular Fiddle as designed presently.
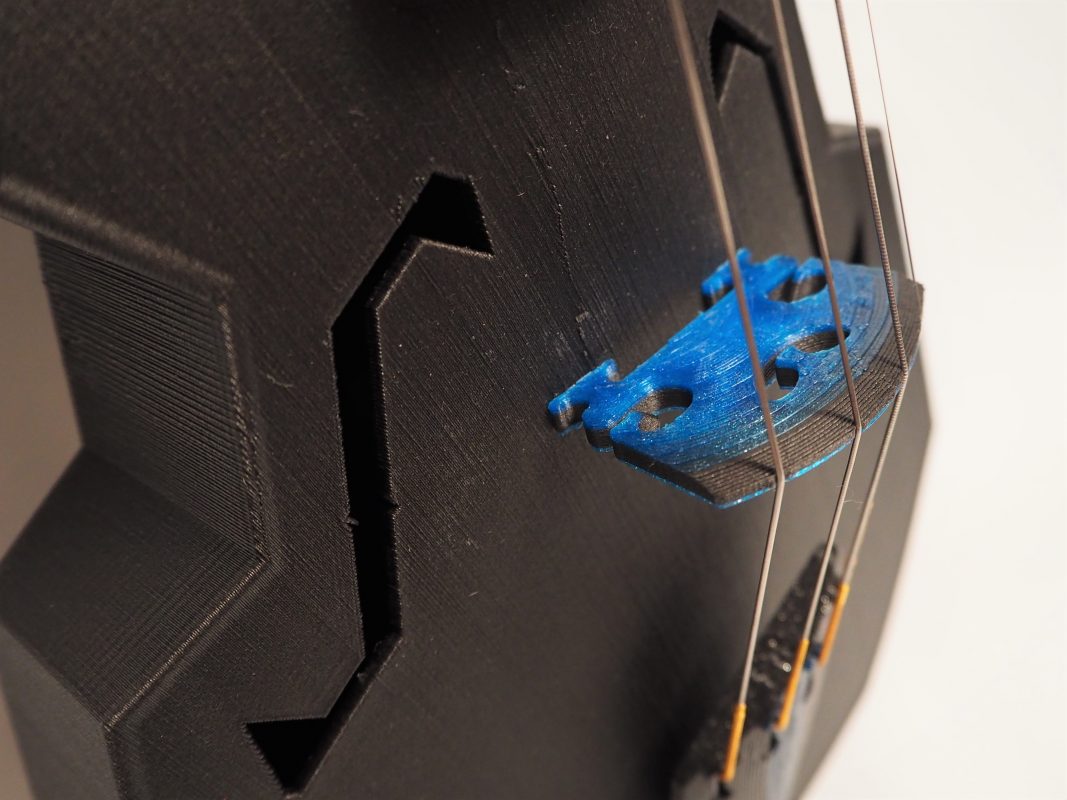
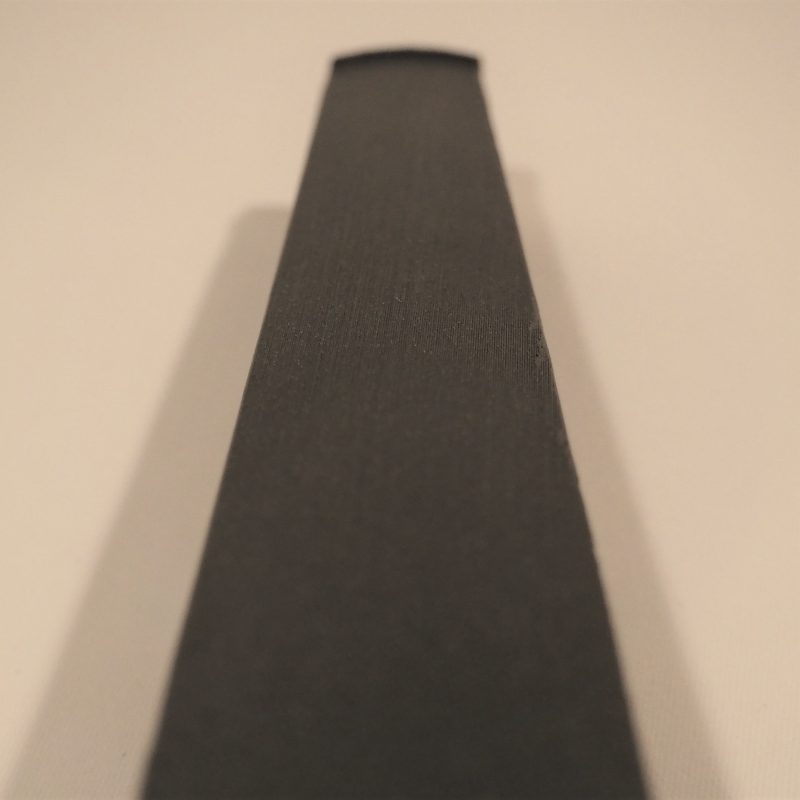
CFPLA makes the best bridges, too! In fact, a CFPLA bridge is the easiest upgrade to your Modular Fiddle. If you want to introduce some flair, you can swap filaments mid-print to add color to your bridge as shown, above. Just print most of the bridge with CFPLA to get the performance benefits.
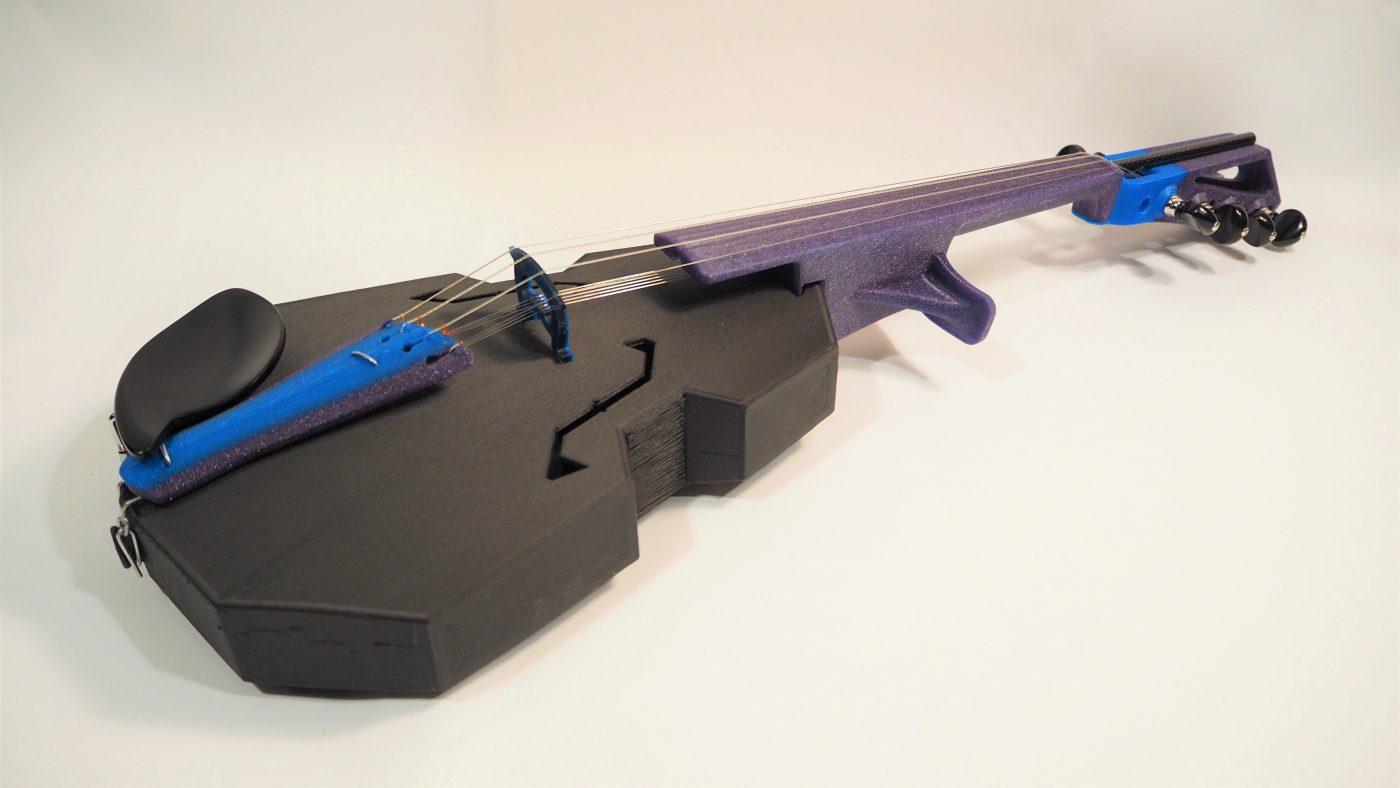
Standard PLA works well for all other parts. PLA is naturally quite stiff, but unfortunately deforms rapidly if it gets hot. The Hardanger Modular Fiddle, above, uses glitter infused HTPLA for the tailpiece, neck, and pegbox. I did not anneal these parts. If you like PETG, that works OK but is a little flexible for the neck. ABS would probably be similar — a little flexible but functional.
The neck benefits from a carbon fiber reinforced filament. Over time, a non-reinforced plastic is more prone to deforming. In my experience, the necks I print in CFPLA or HTPLA-CF do not warp at all over time. That said, standard PLA with a truss rod seems to hold up very well and while some of my necks show warp, I have not had to retire a neck due to warp.
Body Print Settings for Version 2 and 3 Bodies
Version 2 was released 4/2/2021. The neck and body files are now tagged with ‘-V2-RX’. If your neck or body file does not say V2, it is V1. The version and revision number are now modeled into the part as well. All pegboxes, bridges, and tailpieces are compatible with both versions. Your neck and body version number must match!
- Material: CFPLA or material with comparable stiffness for CFPLA body, PLA or similar for PLA body
- Layer Height: 0.25 to 0.3mm, 0.2mm if you want to be fancy
- Extrusion: 0.5mm nozzle with 0.6mm extrusion width (smaller is ok)
- Perimeters: 1 with above extrusion settings, 2 for smaller nozzles
- Infill: 40-50% for 4-string, 50-60% for 5-string. I use hexagonal infill.
- 3 floors/ceilings
- Target mass: 270-300g CFPLA, 285-310g PLA
The Version 2 (and 3) body is designed to print with very different settings from Version 1 bodies. The CFPLA V2 body is optimized for the stiffness and density of CFPLA. Materials of similar stiffness should work well, too. The PLA V2 body is optimized for PLA, and you can use the same print settings for both CFPLA and PLA bodies (changing speed and temps as needed for the materials).
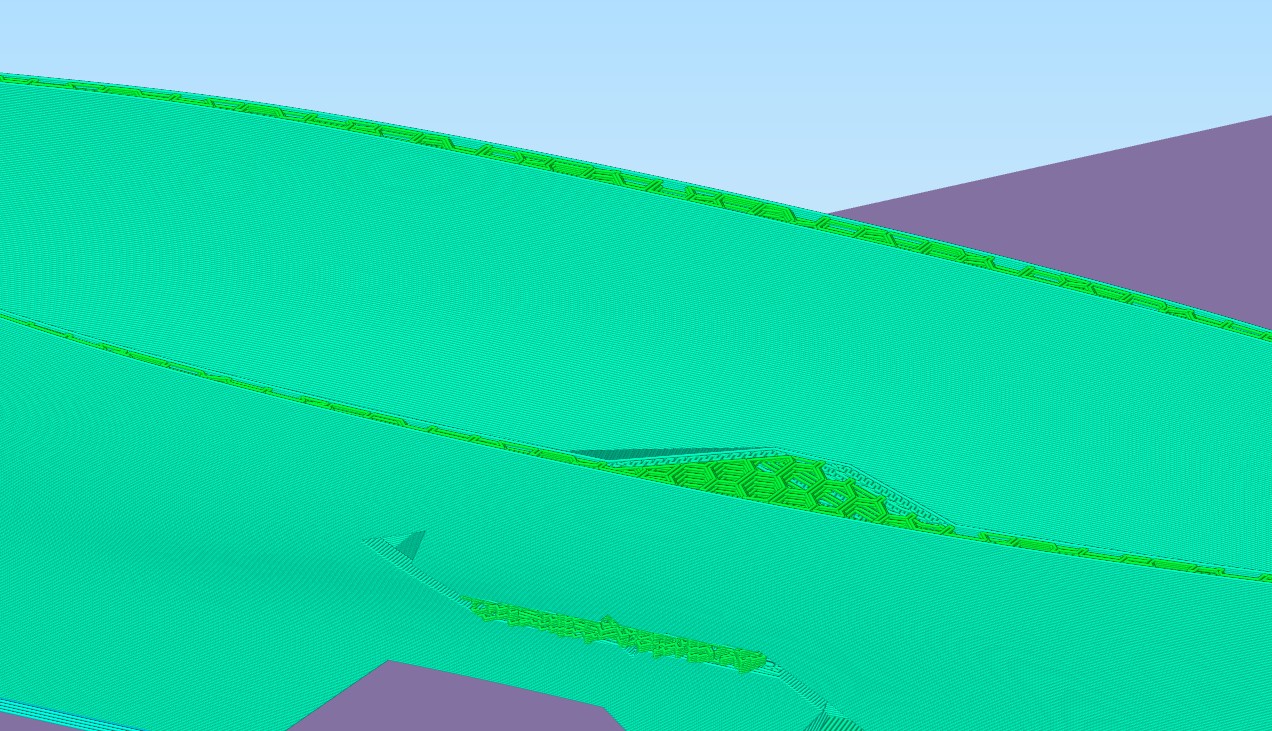
The most significant difference is that the plates on the V2 body are designed to be partially filled with material, not completely filled like what is described below for the V1 body. This allows a higher ration of plate stiffness to density, which in turn improves the ability of the plates to vibrate. If the plates can vibrate more easily, then they make more sounds!
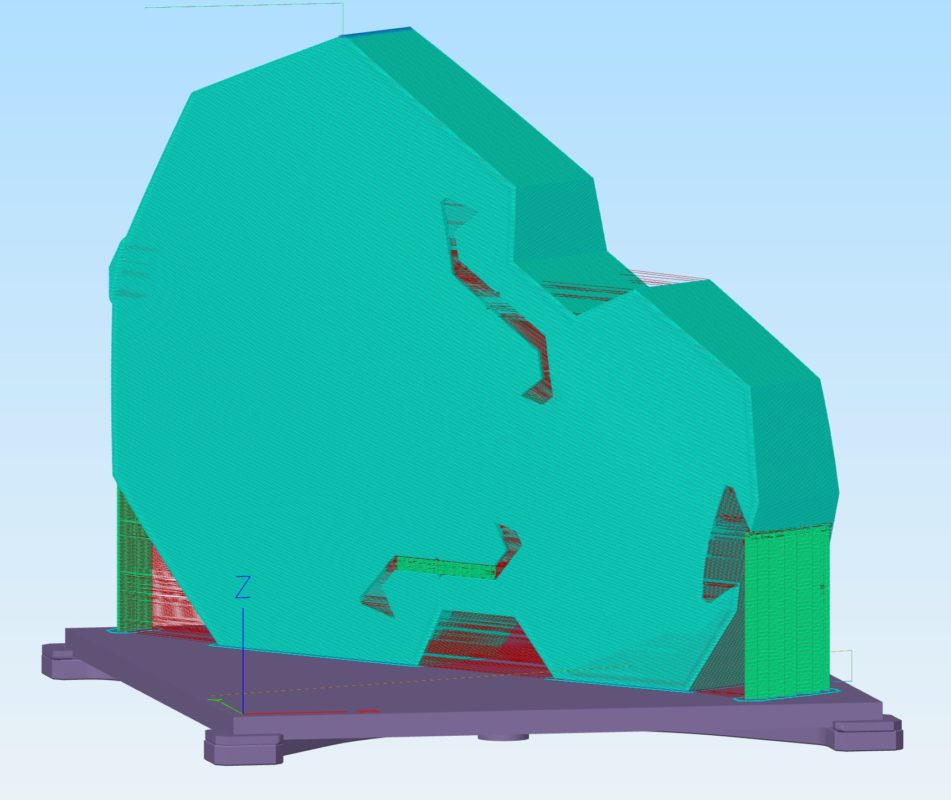
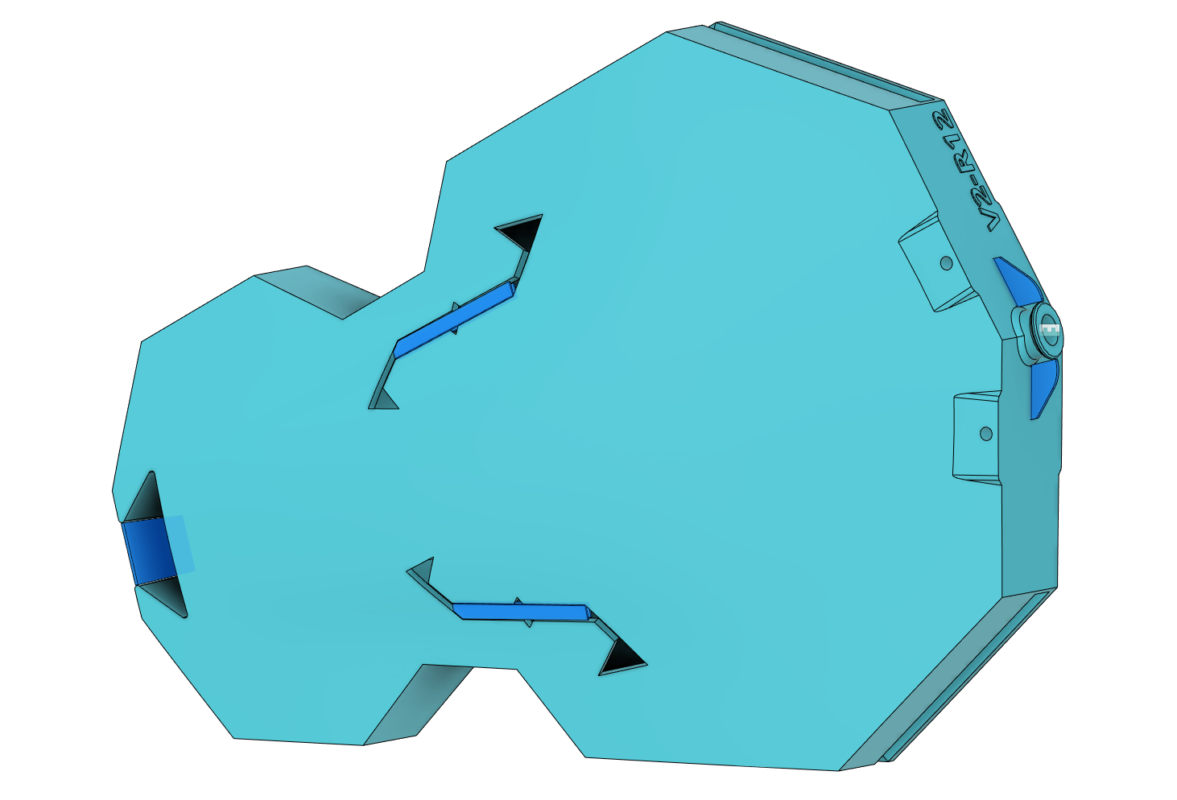
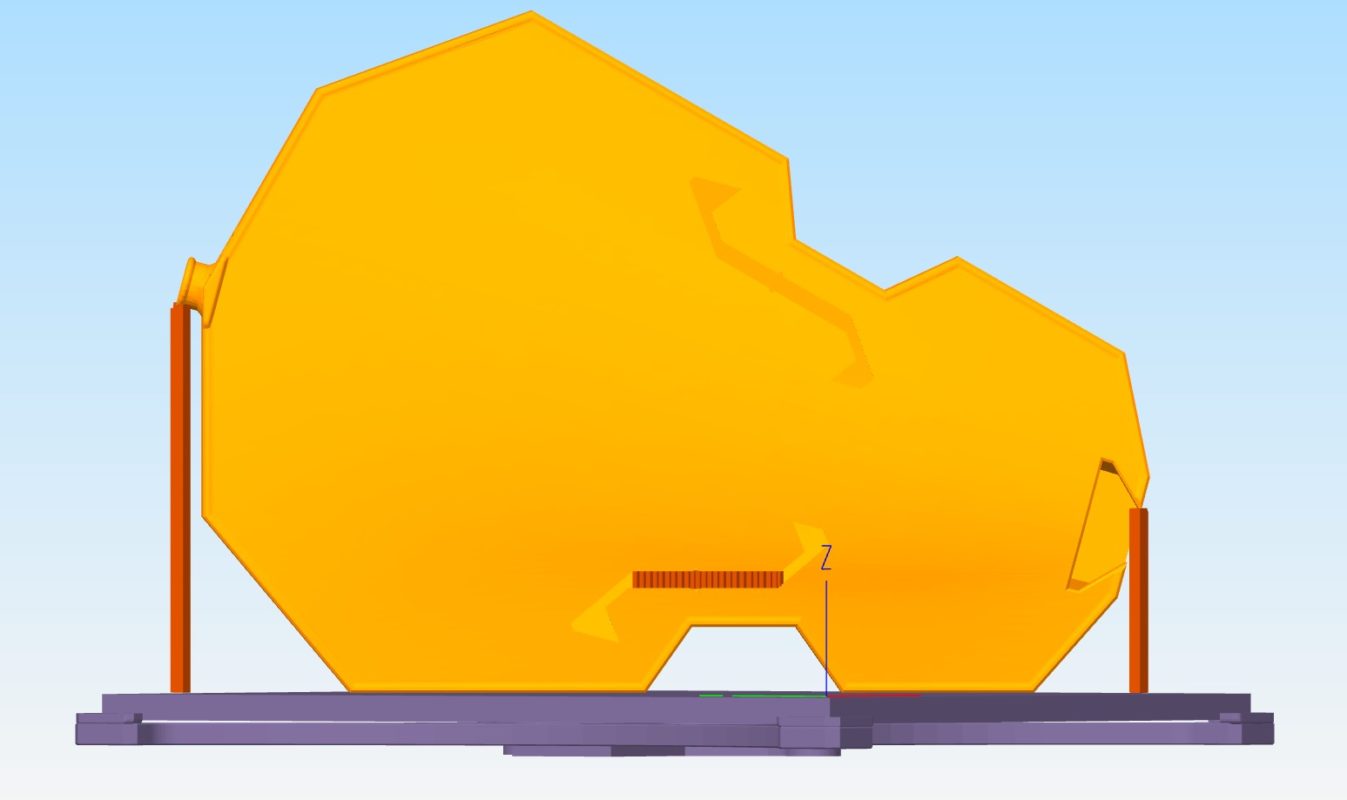
The V2 body is designed with the supports that you need modeled into the part. Here is the V2-R12 body with the supports shown in dark blue:
Before you print the body, make sure you inspect your gcode preview to ensure that your print will go OK. It is possible I forgot to include a support or you are printing an older body type, so don’t assume anything.
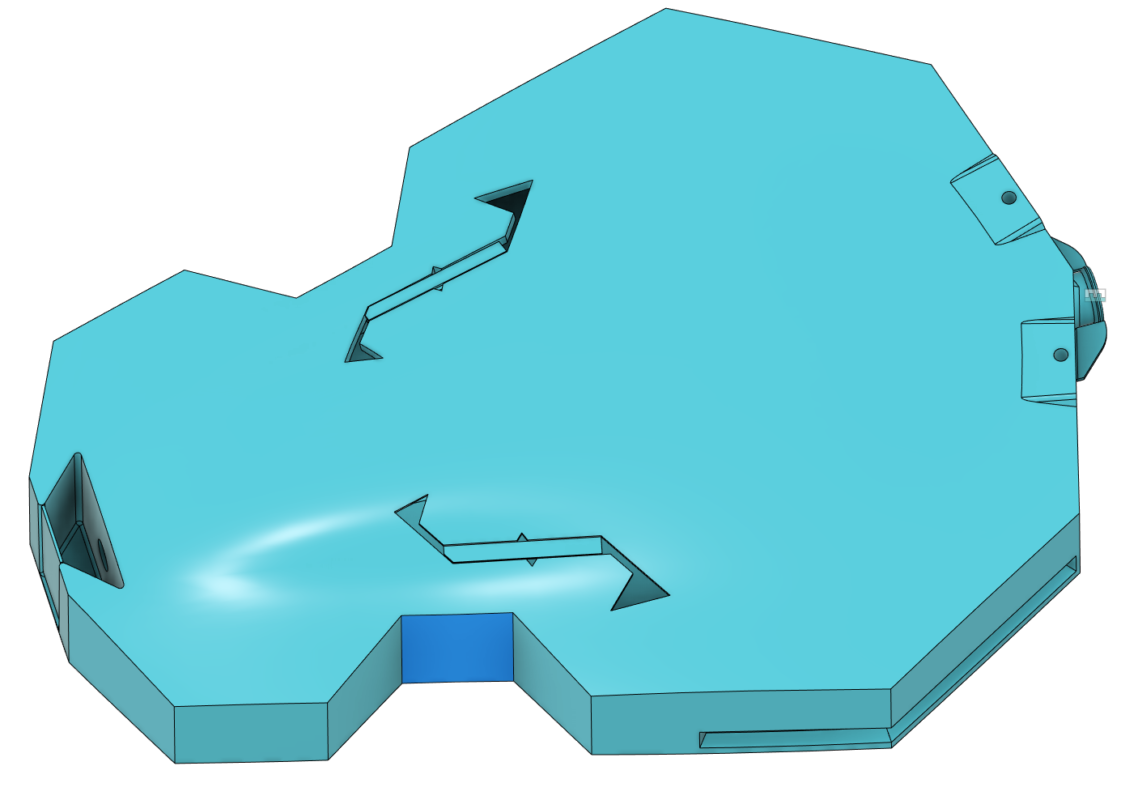
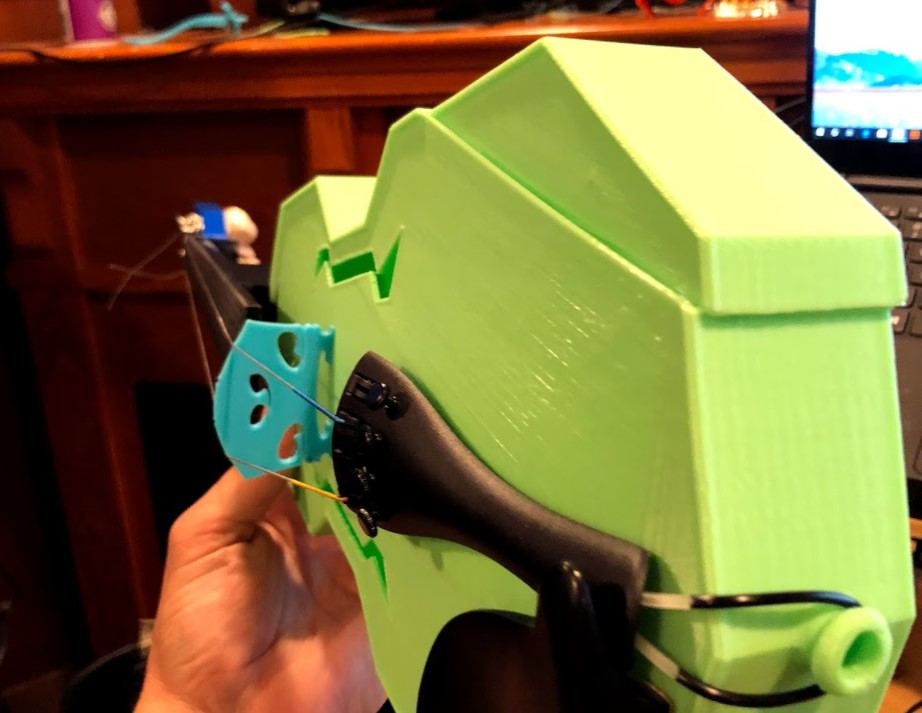
You might consider adding supports to the section shown in blue, below. Some makers have had better results when they use supports for this face.
While many things are different for the V2 body, take the time to read through the V1 info, below. I still recommend starting with a calibration cube!
Electric Bodies and other Side Cases
Patreon supporters have access to a lot of different designs that may or may not make it to be officially released. Many of these do not have features like modeled in supports, so you may need to add supports in your slicer.
Body Print Settings for Version 1 Bodies
- Layer Height: 0.25 to 0.3mm, 0.2mm if you want to be fancy
- Extrusion: 0.5mm nozzle with 0.6mm extrusion width (smaller is ok)
- Perimeters: 3 with above extrusion settings
- Infill: 20% grid
- 3 floors/ceilings
The body of the Modular Fiddle is where the magic happens. For the other parts, as long as they are stiff/strong enough they’ll work just fine. For the body this is not the case!
For example, if your printer under-extrudes the body, the plates (thin walled sections of the body on the top and bottom) will be too flexible and the sound will suffer significantly. The reverse is also true — over-extrusion will change the sound of the instrument.
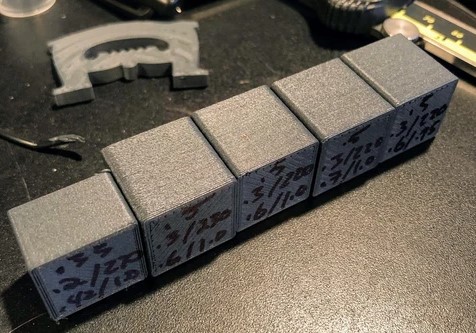
Start with some calibration cubes! For a new material, or if I change my nozzle, I always start by printing 20x20x20mm calibration cubes. Print them with no infill and no ceiling so that you can measure the wall thickness. You want to make sure that the wall thickness is accurate. For example, if you are printing 2 perimeters at 0.6mm extrusion width, you should expect to measure a wall thickness of 1.2mm. If it’s between 1.1 and 1.4, that’s probably OK, but get as close as you can by adjusting your extrusion multiplier.
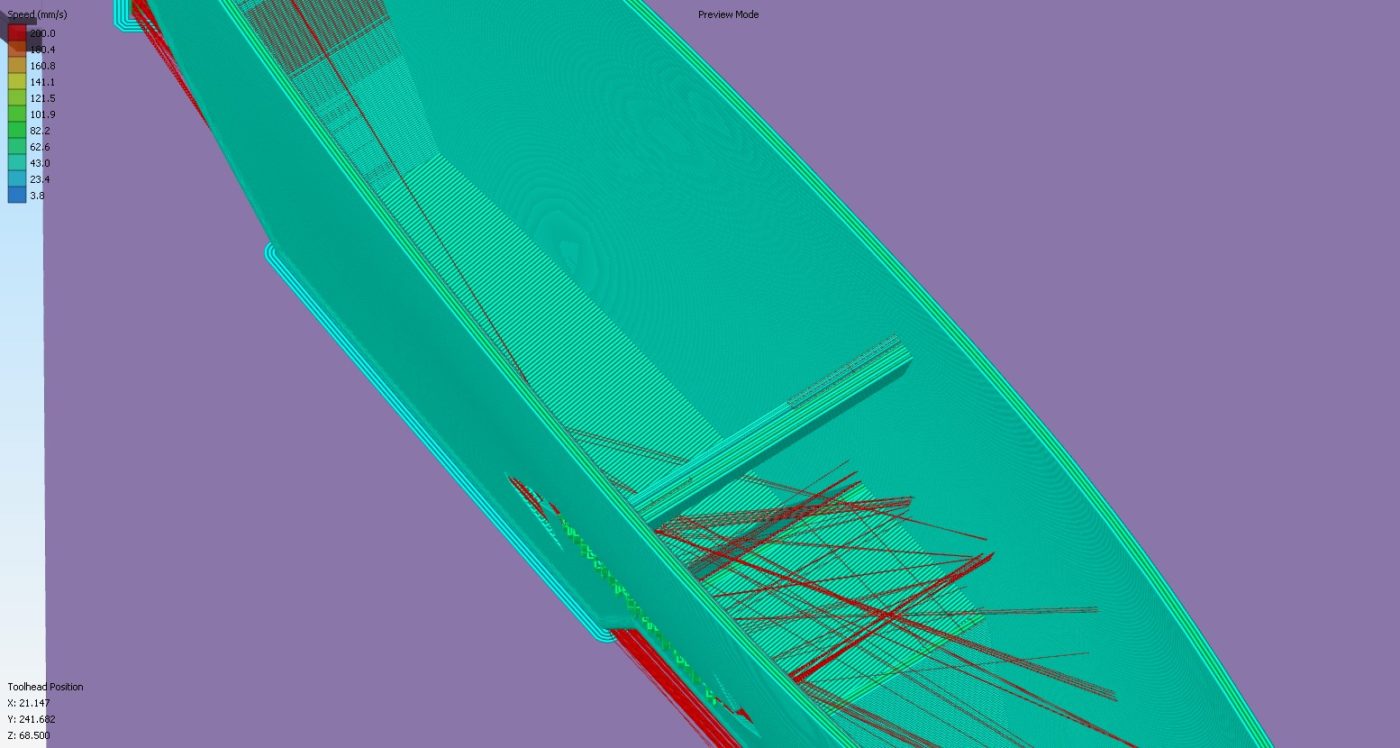
You want the top and bottom plates of the body to be printed solid. In the screenshot, above, you can see that the toolpaths for the plates are several nice concentric perimeters. I like it to look like this, but some solid infill would be fine, too.
I use a 0.5mm nozzle, 0.6mm extrusion width, and 3 perimeters and 20% grid infill. I like to use grid infill as opposed to rectilinear, as I find it to be more structurally solid.
I slice in Simplify3D, and add supports manually to the three areas shown, above. You don’t need any supports inside the body — your printer should be able to bridge the gap between the plates. If you are concerned, find a bridging test, or print the first portion of the body up through the first bridge (about 25mm).
Body Print Fails
The body is a long print, and if you’re using carbon fiber filled material, it can be expensive! A failure on this part can be a real bummer. Let’s go over the most common failure modes.
Stepped Layers
Stepped layers are the most common failures hands down. This can be tragic when it happens towards the end of the print. Now, sometimes you can still use the body…
These stepped layers typically result from the hot end colliding with the print during a travel move. The angled edges of the body print have a tendency to warp a bit, which can cause this type of collision.
If you are struggling with stepped layers, first, make sure you are not overextruding. Next, you can add some Z lift during retraction to cause your hot end to rise slightly above the print during travel moves. I try to avoid this, as on my machine it causes more stringing.
A related failure: sometimes your hotend will knock over the needed support structures. You can help avoid this by printing with a small brim. I typically add four or five perimeters of brim on the first layer. Also, keep an eye on your print. If the supports (usually the one by the end-pin) get knocked over, you can add some tape or something to the body and let the printer build up on that tape. Sometimes, too, the material will magically adhere somewhere and it will sort itself out — so you can also let the print run and see if it fixes itself.
Layer Adhesion Issues
A while back I was preparing a Modular Fiddle kit for a customer. I had just finished a change to my hotend, and it was printing beautiful parts. I cranked out the customer prints, packed up the kit, and sent them off. A week later, the customer emailed me because the body had cracked during installation.
I thought to myself, “surely they forced it much too hard, but I’ll send a replacement part.” I printed out the replacement part and started testing it to make sure it was acceptably strong. A firm squeeze on the body and CRACK! The layers cracked dramatically along layer lines!
For whatever reason, I needed to bump up my hotend temperatures 5-10 degrees to get good layer adhesion. After doing this, the parts were super solid.
The takeaway: customers make the best testers! Oh, and squeezing firmly on the body should not cause a crack. Check your body, and adjust your temps if needed. This could also indicate underextrusion, so if your temps are good but your layers are weak, go back to calibration cubes.
Neck Print Settings (All Versions)
- Material: PLA (you can use a little less material if you print with CFPLA)
- Layer Height: 0.2 to 0.25mm
- Extrusion: 0.5mm nozzle with 0.6mm extrusion width (smaller is ok)
- Perimeters: 3-4 with above extrusion settings, more for smaller nozzles
- Infill: at least 20% grid, triangular, or other structural fill (not rectilinear!)
- 3 floors/ceilings
Get your settings dialed for the neck to reduce your sanding labor, get a really straight neck that’s fun to play, and make a neck that lasts. Settings are the same for V1 and V2 necks. Be sure you print a V1 neck for a V1 body, and a V2 neck for a V2 body!
The neck is straightforward: it needs to be strong and it will want to pull off of your build plate. Use a large brim to aid adhesion. Print with 3 or more perimeters (I use 3 perimeters with 0.6mm extrusion width). Print smaller layer heights (I use 0.2 to 0.25mm) to reduce the sanding work you’ll have to do later. Finally, use a structural infill like grid or triangular (not rectilinear).
The V1 neck can be very difficult to print. The V2 neck is improved for easier printing! Oddly enough, I found that making the neck profile more rounded improved the tricky overhang between nut and false bout.
The neck overhang, even on the V2, can still be tricky. I have a strong downward fan on one of my printers, and I have to orient the neck so that that fan blows such that it pushes extruded filament onto the neck. If it blows away from the neck, I have a neck with a lot of loose strands.
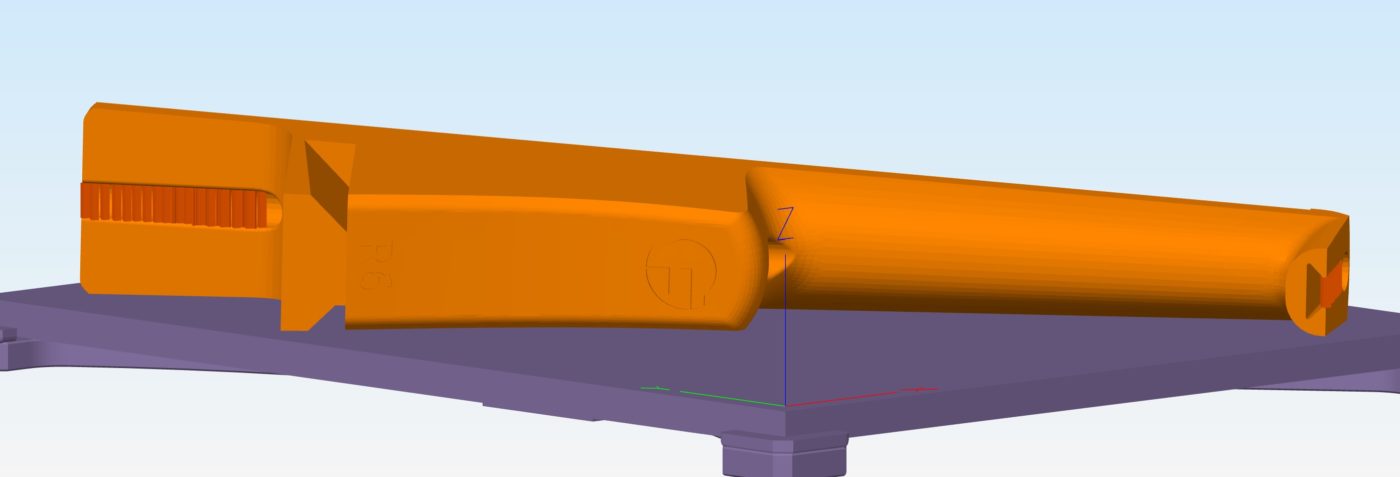
Most V2 necks are modeled with the supports you need built in to the part, so you shouldn’t need to use supports in your slicer. If you are printing a 5-string neck, you might need to add supports to the underside of the joint! Whatever the version, revision, or variation, check your part carefully in the slicer and gcode preview to make sure it will print as expected.
Tailpiece
- Material: PLA
- Layer Height: 0.2 to 0.3mm
- Extrusion: 0.5mm nozzle with 0.6mm extrusion width (smaller is ok)
- Perimeters: 5+ with above extrusion settings
- Infill: 40-50% hexagonal, grid, or triangular (not rectilinear)
- 4-6 floors/ceilings
The tailpiece is the most common broken part, and it usually fails after 4 weeks of use and before 6 months. Print with lots of perimeters and floors/ceilings to ensure a solid frame for the part, and then fill with lots of solid infill. Don’t go light on the tailpiece!
For the 5-string tailpiece I print with 6 perimeters, 5 floors/ceilings, and 50% infill.
Pegbox
- Material: PLA
- Layer Height: 0.2 to 0.3mm
- Extrusion: 0.5mm nozzle with 0.6mm extrusion width (smaller is ok)
- Perimeters: 3 with above extrusion settings
- Infill: 30% hexagonal, grid, or triangular (not rectilinear)
- 3-4 floors/ceilings
The pegbox needs strength, but does not have to withstand the same stress as the tailpiece. I have not experienced many pegbox failures.
Bridge
- Material: CFPLA recommended, but PLA is OK
- Layer Height: 0.15 to 0.25mm
- Extrusion: 0.5mm nozzle with 0.6mm extrusion width (smaller is ok)
- Perimeters: 4-5 with above extrusion settings, more for smaller nozzles
- Infill: 30-50% hexagonal, grid, or triangular (not rectilinear)
- 3-5 floors/ceilings
More strings lead to more bridge failures! If you are printing a 4-string violin or viola, the lighter end of the range should work great. If you are printing a five string, hardanger, or viola da gamba, print with more material.