
Product Design
Process Drives Product Design Creativity, Part 1

May
This August I’ll lead a group of high school teachers in Clackamas County through a 3-day seminar to help them teach students to design and be Makers. What’s the best way to do that? Teach the teachers to make stuff! First lesson: you can’t just say “Here’s a problem, go make a solution.” Instead, you teach a consistent process that can be applied to almost any challenge. I know that I will always find creative and effective solutions to a wide range of problems. Why? Because my design process ensures it. The process gives me something to lean on when I get a difficult project, and it will give students (and teachers) the courage to go be Makers.
I know that I will always find creative and effective solutions to a wide range of problems. Why? Because my design process ensures it.
I’m working through a design of my own in preparation for the seminar, and I’ll be documenting the process here on the blog. I’m breaking this accelerated design into three chunks:
-
Problem definition: requirements, constraints, and design objectives
-
Concept generation and selection: functional decomposition and morphological charts
-
Design and test: paper to computer to prototype
I’ll tackle each chunk in a separate post, and they’ll be released weekly.
Part 1: Problem Definition
Each challenge is presented as a new client showing a “design firm” a potential project. With only this written statement from the client the teacher teams must develop design objectives, requirements, and constraints. Remember: the best solution may not be what the client has in mind! Here’s the challenge I pose myself, spoken from my client’s perspective.
“Here’s the problem, and lots of people have it — I have a hard time keeping my indoor plants alive, I just can’t remember when I watered them. Did I do it recently? Did I just casually dump the rest of my water glass in, or did I give it a good soak? If I water them now will they be too wet? I can’t tell by looking at them and I don’t want to get all dirty sticking my finger in and also ruining my arrangement with a bunch of holes! So instead I just water whenever and hope I get lucky…wait, is that mold?”
“I keep these plants on my desk. I tried a small self-watering planter. Great idea, really, and they can work great, but I bumped it the other day and sloshed dirty water all over my sketchpad! Besides, I can’t use those for my succulents, here, because they need to dry out almost completely. So there’s gotta be a way to do this better. Here’s what I’m thinking: an internet enabled pot that tracks moisture content!”
“Look here, I’ve put together a little something. The pot for the plant has this sensor built in, right here, where it detects the soil moisture. Then, that runs into this little computer taped over here and the data is sent through this ethernet cable and into the cloud. Then you log in on your phone and voila! You could have an app that says, ‘hey, water your Jade tree.’ Great, right?”
“It’s working great but I can’t seem to get the sensor to read very reliably, oh and I fried this board the last time I watered. So we need a water-tight and nice pretty way to hide all these cables and electronics. I need your help to make this work.”
This is a problem I have all the time, so I’m thrilled to get to solve it! Now, I’m not sure that the electrified-sensor-internet approach is the right one. I’d prefer something simpler, something that’s purely visible and tactile. I think that’s what most people would want, so I’m going to back up, frame the problem, and come back to my client with three compelling solutions.
Regularly and intentionally reviewing and revising your constraints, requirements, and objectives is an important part of the design process.
Defining the problem means developing three things: constraints, requirements, and design objectives.
-
Constraints are somewhat firm limits imposed by physics, manufacturing methods, available resources, or design decisions you already made.
-
Requirements are features or functions that the product must have or perform to be acceptable.
-
Design objectives (the most fun) are the goals of your design, which you will aim to accomplish as best you can given the constraints and requirements.
These three crucial components of any product design will change and evolve as the design develops. Regularly and intentionally reviewing and revising your constraints, requirements, and objectives is an important part of the design process.
So how do you start? For a major project with sufficient budget I employ a technique known as QFD, or Quality Function Deployment. For this, we’re just going to read over the problem statement, use our brains, and write stuff down.
First, write down the problem as you understand it. Write it again, and try to break it into more measurable language.
Help user keep plant alive.
Remind user to water plant.
Design an indoor planter that assists the user in maintaining optimal moisture content.
Great! That’s the goal. What is required of the finished product? These are our requirements.
Requirements
- Product shall not leak if bumped during regular use.
- Product shall allow re-planting.
- Product shall be waterproof, but not submersion proof.
- Product shall be manufacturable at a reasonable cost.
- Product shall accommodate a variety of plants: from garden herbs to succulents.
Constraints
- Product must not be larger than 150mm in any direction. (about the size of a tissue box).
- Product must be prototype-able using the tools at our disposal.
- Product must not require any special tools or consumables.
Design Objectives
In order to decide on design objectives, we need to better understand and define the system. In particular, what are all the things that effect the soil moisture content of an indoor plant? Write down all the variables you can think of. Ask other people, search the internet, and write it all down. I like to make a table of variables. Then I rank each variable for various categories. For this design, each variable gets three ratings from 1-5. Those ratings correspond to these questions.
A. How much influence does this variable have on moisture content? 1 (little) to 5 (lots of influence)
B. How much difficulty does this variable cause for the user? 1 (user doesn’t think about it) to 5 (constantly nagging)
C. How easy is it to influence this variable with the container (our design)? 1 (practically impossible) to 5 (very easy)
Next, combine those rankings to get a single value. I have chosen to weight the final value as: A*(B+C). This gives more weight to the degree of influence of any single variable. Now — none of this is set in stone! Use your common sense. Are you going to design a container that controls plant respiration rates? No, because you can’t.
Here’s my variable selection matrix. Pardon the informality (and slanted lines), you’re seeing the inner workings here!
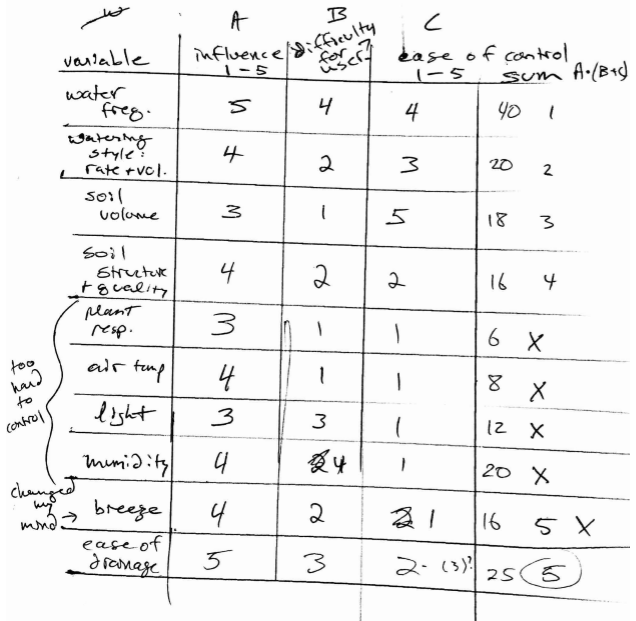
Using this matrix and my sense, I rank the top five variables and eliminate others. Now I know what I should focus on with my design!
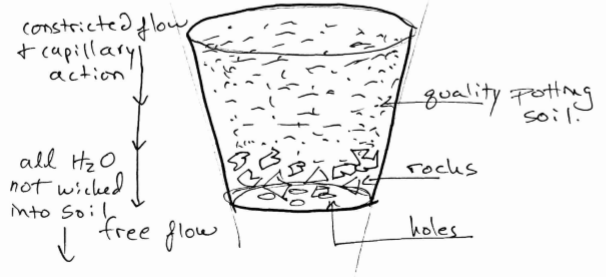
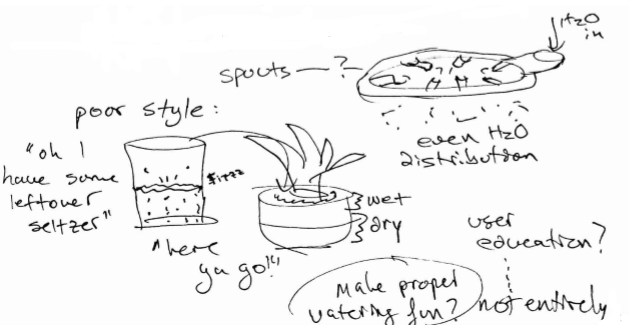
Now I carefully analyze the selected variables to understand how they work and what they do. It’s a thorough but informal analysis; typically a combination of rough sketches and text that more resembles conversation than engineering analysis. Here are some sketches from this process:
After careful thought, here are my design objectives:
Product shall signal or prompt user at a certain soil moisture level.
Product shall encourage and reinforce proper watering technique.
Product shall maximize the ratio of volume to surface area, within reason.
Product shall include features such that the user need only add plant and soil.
OK, let’s take a break! We know what our design must do, we know what constraints we need to work with, and we have a list of objectives that we’re designing for. Next, we’ll dive deep into the product’s function with a process called functional decomposition. Then, using the functions produced by decomposition, we’ll start generating concepts with the use of a morphological chart. Then we’ll combine concepts to make more concepts and analyze them all with another selection matrix! You don’t want to miss it. Go to Part 2.